HelloWorld.xml.Note: The default editor for a
.xml file is a simple text
editor until it has buildfile content - which can be changed on the
 Window > Preferences > General > Editors >File Associations preference page.
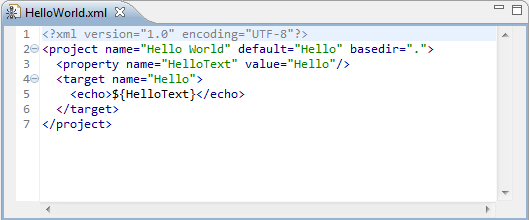
<?xml version="1.0" encoding="UTF-8"?>
<project name="Hello World" default="Hello" basedir=".">
  <property name="HelloText" value="Hello"/>
  <target name="Hello">
    <echo>${HelloText}</echo>
  </target>
</project>
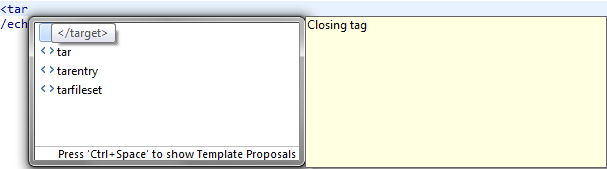
<tar, then hit Ctrl-Space
to activate content assist. A list of valid completions is presented. Select the <target> completion and
notice that the editor inserts both the opening and closing tags and leaves
the cursor positioned to enter attributes for this tag.World.echo task for this target similar to that for the Hello target,
but change the text to ${WorldText}.World target from the Hello target. Place the cursor after the definition of the name attribute, hit Ctrl-Space
and select the depends attribute completion. Hit Ctrl-Space again to get the completion for the other target World in the buildfile.
<?xml version="1.0" encoding="UTF-8"?>
<project name="Hello World" default="Hello" basedir=".">
  <property name="HelloText" value="Hello"/>
  <property name="WorldText" value="World"/>
  <target name="Hello">
    <echo>${HelloText}</echo>
  </target>

  <target name="World">
    <echo>${WorldText}</echo>
  </target>
</project>
HelloWorld.xml.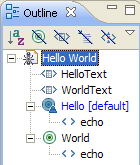
<target> tags,
type <tar, then hit Ctrl-Space to activate content assist. Notice that
now the only valid completions are the </target> and the tar tag. This is because the Ant editor
knows that nested targets are not allowed.